
4.1.1 Home
The Home page under Basics contains the main sampler and sensor timing controls for the connected SmartSampler2. After connecting, SmartConfig2 normally loads the device configuration automatically. Use Reload Settings only if automatic loading did not complete or you need to refresh the displayed values.
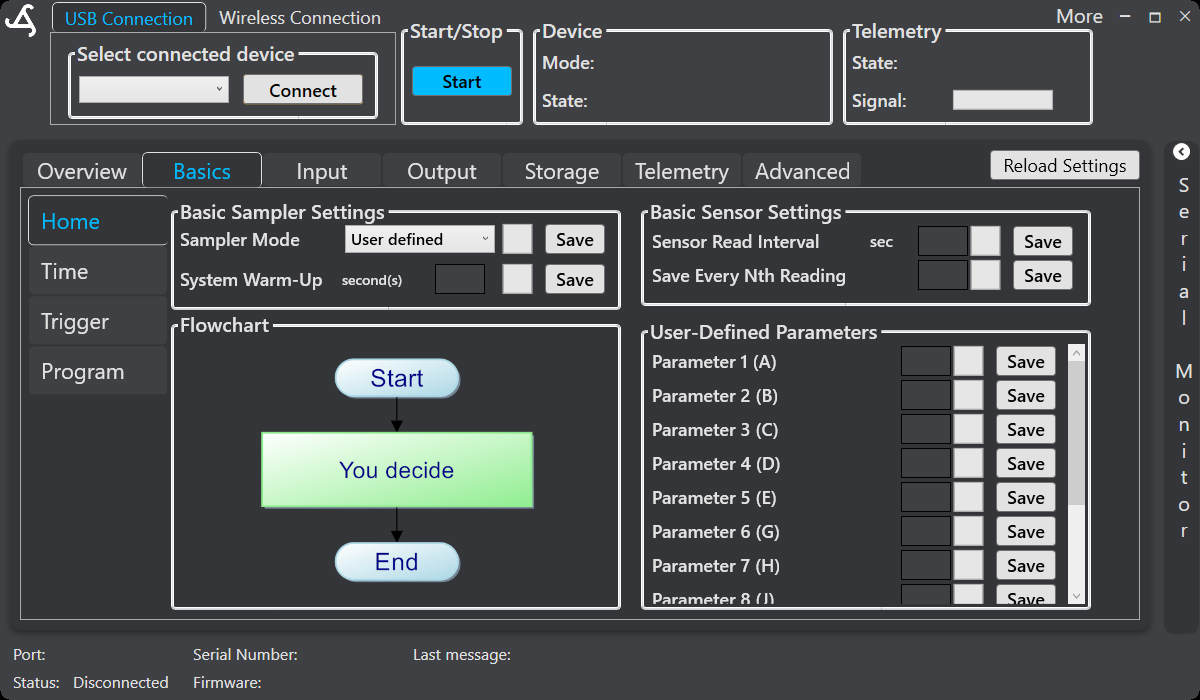
Basic sampler settings
- Sampler Mode: Select the supported operating mode. User defined uses the program configured on the Basics > Program page. Other modes are shown when supported by SmartConfig2 and the connected SmartSampler2.
- System Warm-Up: Set the startup warm-up period in seconds, then select Save. This period allows the system and telemetry to initialize before the actual operating program begins. Sensors are usually not switched on during this startup warm-up. The countdown must finish before sampling or the selected operating program starts.
Basic sensor settings
- Sensor Read Interval: Set how frequently SmartSampler2 requests sensor readings, in seconds, and select Save.
- Save Every Nth Reading: Set how often sampled readings are written to storage, then select Save. This setting is separate from the sensor read interval. For example, when sensors are read every second and this value is
10, every tenth reading is saved.
These settings control reading and storage timing; they do not create an averaged measurement. Configure storage and telemetry separately where required.
Flowchart and user-defined parameters
When User defined is selected, the flowchart preview shows the program entry and exit points. The preview may display Start, You decide, and End while the program itself is configured separately.
The User-Defined Parameters panel provides editable parameter fields, including parameters such as A, B, C, D, E, G, and H. Save each parameter with its adjacent Save button. Programs can use these values for supported timing, comparison, formula, and control actions.
Configure and apply the settings
- Connect SmartConfig2 to the SmartSampler2 and allow the configuration to load.
- Select the required Sampler Mode and save it.
- Set and save the system warm-up period.
- Set and save the sensor read interval and save interval.
- If using a user-defined program, configure its parameters and open the Basics > Program page to review or edit the program.
- Configure the start and repeat conditions on the Trigger page before starting operation.
SmartSampler2 can calculate scheduled operation from the configured sampling interval and, when low-power operation is enabled, can wait in a low-power state until the next scheduled wake-up. The available power and startup options are documented in Advanced settings.
Operation controls
Use the main Start control to start the configured operation when connected. SmartConfig2 reports the device state, including states such as Ready, Running, Running: Warming up, and Stopped, when reported by SmartSampler2. Stop operation using the available stop control.
Related documentation
For the physical connection and interfaces used during setup, see the SmartSampler2 Hardware Interfaces reference. For programmable sequences, see the User-defined program documentation.
Related hardware: SmartSampler2 hardware reference.