
4.1.3 Trigger
The Trigger page under Basics defines when SmartSampler2 begins its first sampling sequence and when later sequences repeat. The Initial trigger and Repeating trigger are configured independently.
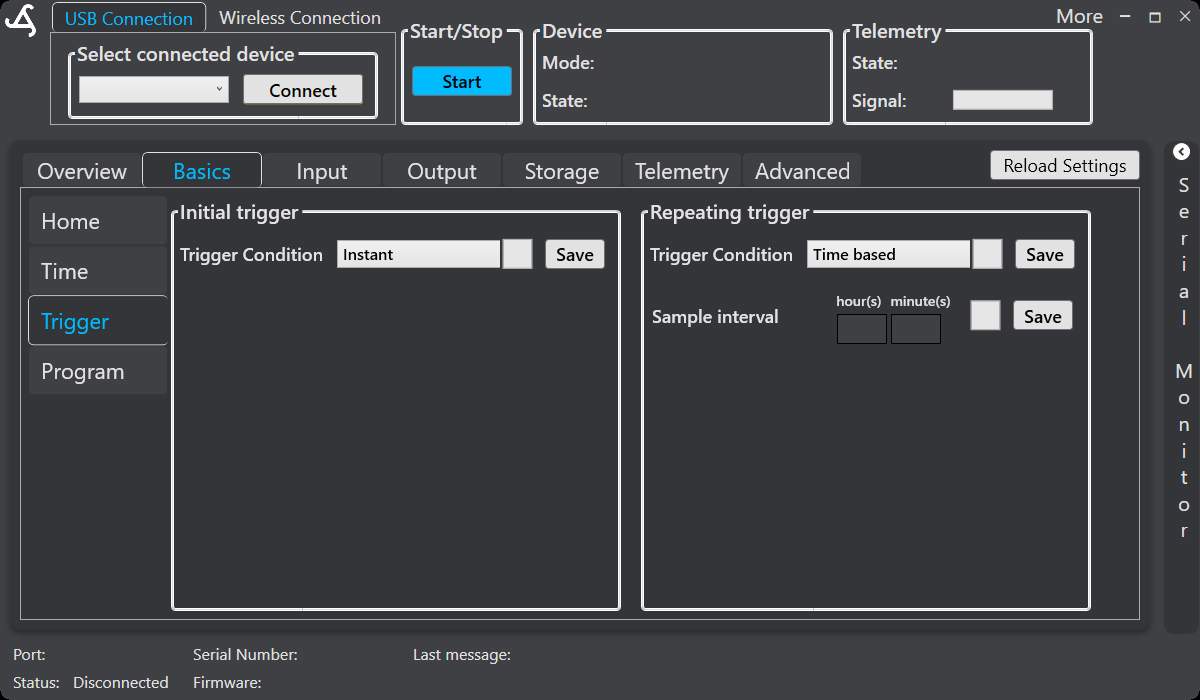
Initial trigger
The Initial trigger determines when the first sampling sequence starts. Select a trigger condition and select the adjacent Save button.
- Instant: Starts when the configured operation is started.
- Time based: Waits for the configured clock time. The time controls appear when this condition is selected.
- Sensor based: Waits until a configured sensor value meets the selected condition. Configure the sensor condition, threshold or thresholds, and the sensor variable position when those controls are displayed.
- Time and/or Sensor based: Starts when whichever configured time or sensor condition occurs first.
Repeating trigger
The Repeating trigger determines how SmartSampler2 proceeds after the initial sequence. Select the condition and select the adjacent Save button.
- Instant: Continues without waiting for a repeating trigger condition.
- Time based: Repeats at the configured Sample interval. Enter the interval in hour(s) and minute(s), then select Save.
- Sensor based: Starts each repeat when the configured sensor condition is met.
- Time and/or Sensor based: Repeats when whichever configured time or sensor condition occurs first.
Sensor trigger conditions include Less than, Greater than, Between inclusive, Not between inclusive, and Varies from last trigger. The sensor must be configured and available before a sensor-based condition can be evaluated.
Configure a trigger workflow
- Connect SmartConfig2 to SmartSampler2 and allow the configuration to load.
- Open Basics > Time and verify the device clock before using a time-based condition.
- On Basics > Trigger, select and save the initial trigger condition.
- Configure any displayed time or sensor values and save them.
- Select and save the repeating trigger condition.
- Enter and save the repeating sample interval when using a time-based repeat.
- Start the operation from the main Start control and check the reported device state.
Remote and delayed starts
A configured operation can wait for a scheduled start, a sensor condition, or a combined condition. A remote trigger can start a configured sampling operation when the applicable wireless telemetry connection is available. For supported non-user-defined modes, SmartSampler2 performs the configured startup warm-up before the operating sequence begins. In User defined mode, the user program controls its own actions after the applicable start condition.
Troubleshooting
- For a time-based trigger, verify the RTC on the Time page.
- For a sensor-based trigger, confirm that the sensor is configured, powered as required, and producing the expected variable.
- Check that the selected sensor variable position corresponds to the received sensor data.
- Save each changed section and review the device state on the Home page or in the main interface.
Related documentation
For programmable sequences using delays, sensor reads, comparisons, counters, and subprograms, see the User Program actions documentation. For the physical device connection and interfaces, see the SmartSampler2 Hardware Interfaces reference.
Related hardware: SmartSampler2 hardware reference.