
7.1 Settings
Configuration and diagnostic records
SmartSampler2 records important configuration and operating information when it starts. These records help reconstruct the device state after a deployment, power cycle, reset, or unexpected behavior.
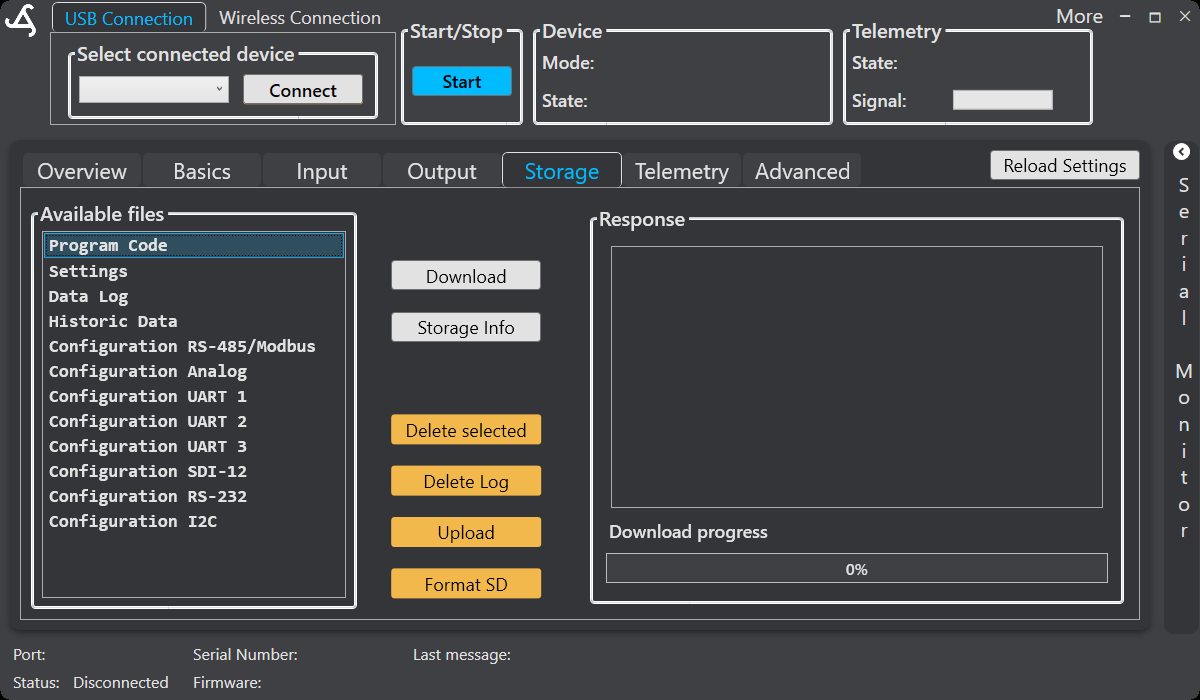
Local storage can contain supported program and system settings, raw sensor data, historical data prepared for transfer, interface communication records, telemetry-related records, firmware-update activity, and error information. Use the Data storage area in SmartConfig2 to review or manage the supported settings and data files.
Operating mode
SmartConfig2 configures the operating workflow selected for SmartSampler2. Available customer-facing workflows include User-defined, AquaMate, and TreeFlux. Select the required workflow in the appropriate SmartConfig2 area, then save the supported settings to SmartSampler2.
Sampling interval
The sampling interval determines how frequently the configured sampling program is scheduled. SmartConfig2 presents this setting in hours and minutes. Save the setting to SmartSampler2 after changing it.
Sensor read interval
The sensor-read interval determines how often configured sensors are read. It is independent of the interval used to write readings to storage, allowing the device to monitor sensors more frequently than it records them.
Supported sensor sources can include analog inputs, RS-232, RS-485 Modbus, I²C, SDI-12, and UART interfaces, subject to the connected hardware and activated features. Configure each interface in Input ports.
Save interval
The save interval determines how often sampled sensor readings are written to storage. For example, when sensors are read every second and the save interval is 10, every tenth reading is saved.
Saved records can include a timestamp, voltage fields, enabled input values, and supported sampler-mode data. The available columns depend on the configured and activated inputs.
System configuration
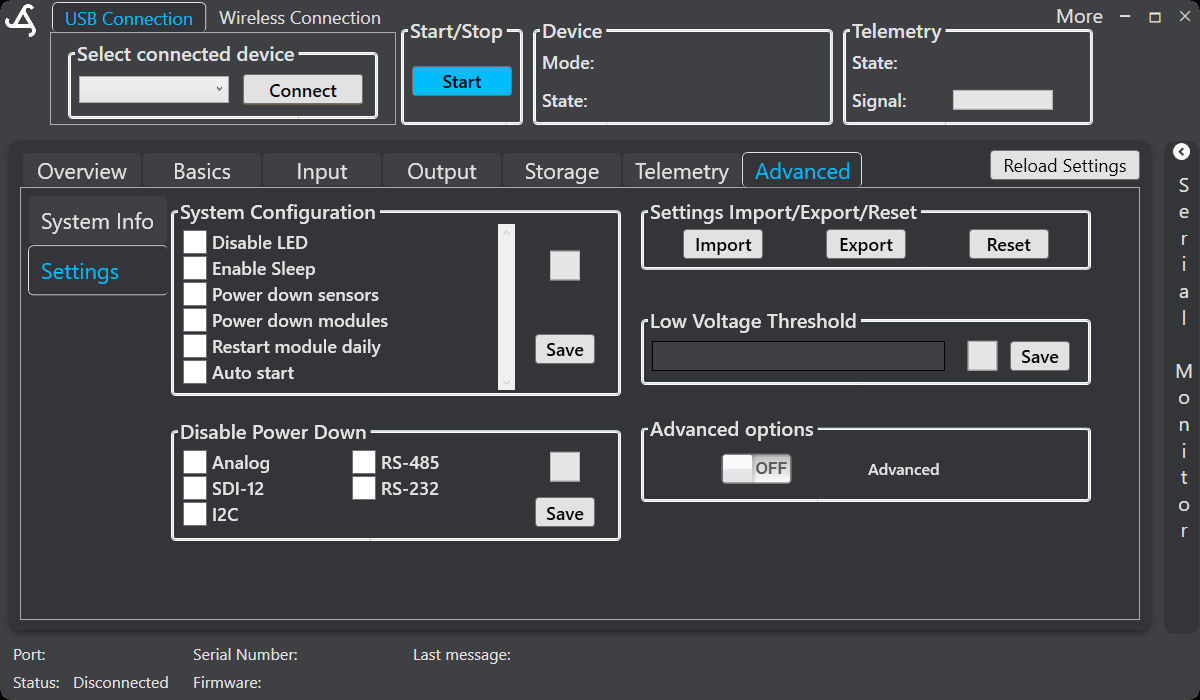
Open Advanced > Settings to review system-wide options. The visible controls include:
- Disable LED
- Enable Sleep
- Power down sensors
- Power down modules
- Restart module daily
- Auto start
Use the relevant Save button after changing system configuration. The same screen provides a supported low-voltage threshold control and options to prevent power-down for selected interfaces, including Analog, SDI-12, I²C, RS-485, and RS-232.
Settings transfer and reset
Use Import and Export in Advanced > Settings to transfer supported SmartSampler2 settings. Export the current configuration before making substantial changes so that it can be reviewed or restored when appropriate.
The Reset control sends a reset request after SmartConfig2 asks for confirmation. Review the configuration and hardware requirements before resetting a deployed device.
Startup and deployment checks
At startup, SmartSampler2 reads its saved configuration, checks the active sensor-port configuration, and initializes supported interfaces and modules. If a configuration check fails, the sampler reports a configuration error instead of proceeding normally.
When configured for unattended operation, SmartSampler2 can start automatically when the main supply is within the configured acceptable range and no USB connection or USB command is present. A USB connection can therefore affect startup behavior during configuration and diagnostics.
- Configuration and operating information is recorded at startup.
- Interface and error records help distinguish configuration issues from sensor or module communication issues.
- Settings import, export, reload, and reset should be performed through the supported SmartConfig2 controls.
Startup warm-up
The startup warm-up period allows the system and telemetry to initialize before the actual program begins. Sensors are usually not switched on during this startup warm-up. The warm-up countdown completes before the actual sampling or operating program starts.
Reviewing settings during diagnostics
Connect to SmartSampler2 and allow SmartConfig2 to retrieve the settings automatically. Use Reload Settings only when the automatic retrieval did not complete or when an explicit refresh is required. If a setting write or reload is in progress, use the visible progress feedback and wait for the operation to complete before disconnecting.
For physical inspection, connector care, fuse and wiring checks, and water-ingress precautions, see SmartSampler2 Diagnostics & Maintenance. Follow the hardware safety instructions before inspecting or servicing field equipment.
Related hardware: SmartSampler2 hardware reference.