
4.5.5 Connect to Platform
SmartSampler2 can send sensor data and status information through its installed cellular telemetry module. SmartConfig2 provides the controls for selecting the telemetry provider, entering connection details, saving the configuration, and checking the resulting connection status.
Connect SmartConfig2 to SmartSampler2 before loading or saving telemetry settings. The Overview screen provides the connection controls and navigation to the Telemetry area. SmartConfig2 normally retrieves the device configuration automatically after connection; use Reload Settings only if retrieval did not complete or you explicitly need to refresh the displayed settings.
Select a telemetry provider
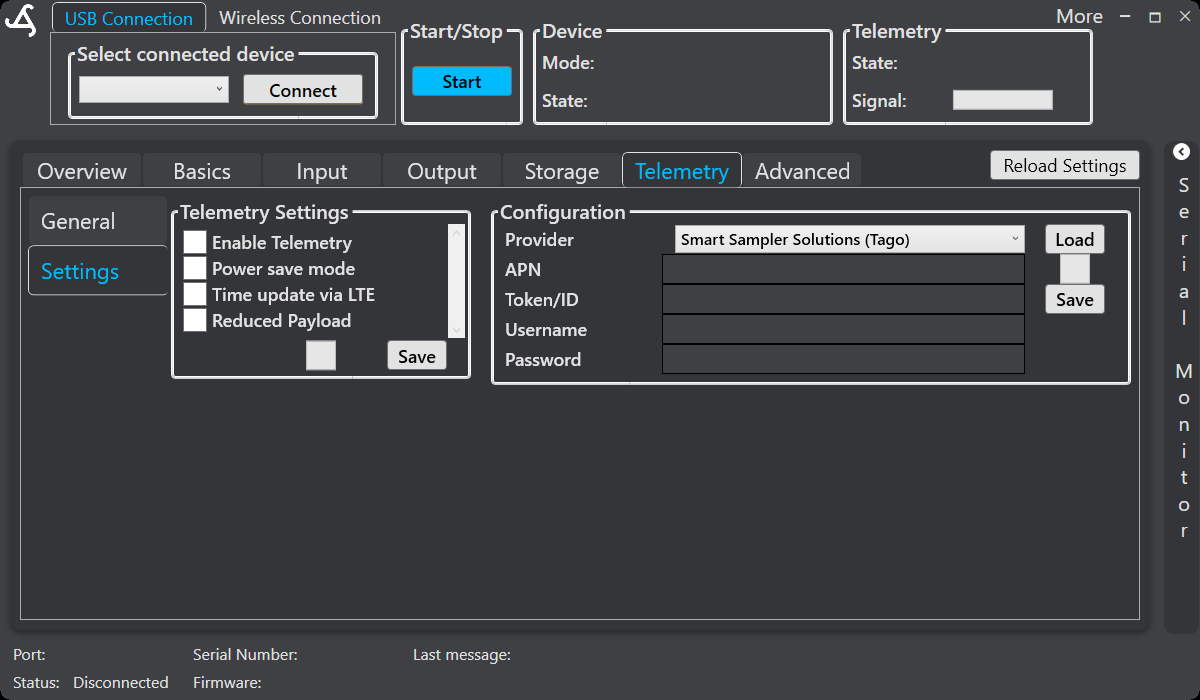
Open Telemetry and select Settings. The Configuration section contains a provider selector and the connection fields. For standard deployments, select Smart Sampler Solutions (Tago). This is the managed provider option shown in SmartConfig2 and is the recommended choice when your telemetry service is managed by Smart Sampler Solutions.
If your deployment uses customer-supplied telemetry credentials, select the provider option specified for that deployment and enter the connection details provided by the responsible service administrator. Do not copy credentials, device identifiers, or customer connection information into screenshots or ordinary support messages.
Configure the connection
The Telemetry Settings view provides the following connection fields:
| Field | Use |
|---|---|
| APN | Enter the access-point name required by the SIM provider, if one is required. |
| Token/ID | Enter the device token or identifier required by the selected telemetry service. Leave this field empty only when the deployment instructions specify that no value is required. |
| Username | Enter the username supplied for the selected telemetry service, when required. |
| Password | Enter the password supplied for the selected telemetry service, when required. |
The current SmartConfig2 Settings view also includes controls for Enable Telemetry, Power save mode, Time update via LTE, and Reduced Payload. Configure these options according to the deployment requirements. They are separate from the provider connection fields.
Load or save telemetry settings
- Connect SmartConfig2 to SmartSampler2 using USB or the supported wireless connection.
- Open Telemetry > Settings.
- Select the required provider.
- Choose Load to retrieve the provider configuration for the connected device, when available.
- Enter or edit the APN, Token/ID, username, and password required by the deployment.
- Choose the Save button in the Configuration section to send and store the connection settings in SmartSampler2.
- If you changed the general telemetry options, use the Save button in the Telemetry Settings section as required.
Handle all connection credentials as confidential deployment information. Before sharing a screenshot, remove or obscure credentials, serial numbers, device identifiers, and other customer-specific information.
Check the connection
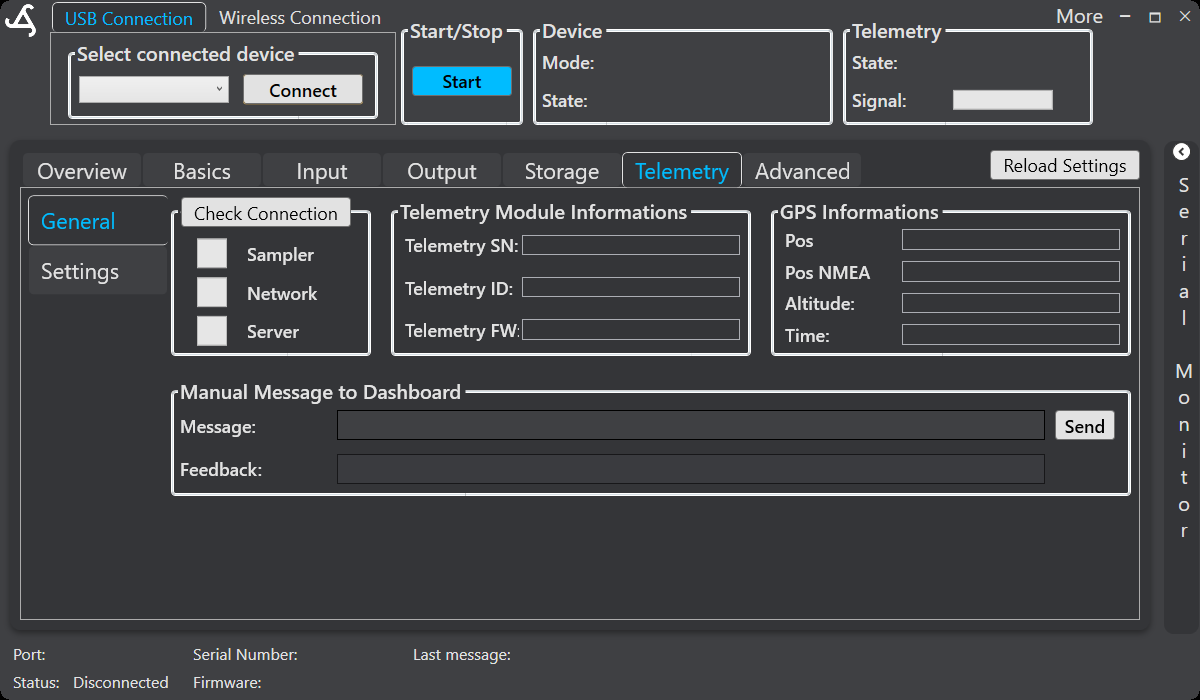
Open Telemetry > General and choose Check Connection. SmartConfig2 shows separate indicators for:
- Sampler — communication with SmartSampler2;
- Network — registration on the cellular network; and
- Server — connection to the configured telemetry service.
The same view can display telemetry-module information, including the telemetry serial number, telemetry ID, and telemetry firmware. When available, GPS information includes position, NMEA position, altitude, and time. The displayed values depend on the installed telemetry hardware, network availability, and GPS reception.
Telemetry operation after connection
When connected to the configured telemetry service, SmartSampler2 can transmit sensor data and device status through the cellular connection. Data records contain timestamps and named variables where supported. If the server connection is temporarily unavailable, outgoing records can be queued and stored locally for later transmission when connectivity is restored.
SmartSampler2 monitors the cellular and server connections and attempts recovery after a lost or unresponsive connection. During connected operation it maintains the server connection, checks for incoming supported messages, and can receive supported remote commands or settings requests through the configured telemetry service.
Supported remote service workflows can also request a firmware update. When such an update is available and the required device and service conditions are met, SmartSampler2 retrieves the update through the cellular connection, enters firmware-update mode, and reports progress through its supported status and diagnostic output.
Manual dashboard messages
The General view includes a Manual Message to Dashboard area. For a publication test, enter a message such as export,1234, then choose Send. SmartConfig2 displays the result in the Feedback field. Use the test value specified for the deployment; this control is not required for normal automatic sensor-data transmission.
Troubleshooting connection problems
- Confirm that SmartSampler2 is powered and that the telemetry module is installed and enabled for the deployment.
- Verify the APN and other connection values with the SIM or telemetry-service administrator.
- Save the settings again, then use Telemetry > General > Check Connection.
- Use the separate Sampler, Network, and Server indicators to identify which connection stage is unavailable.
- Check the telemetry-module and GPS information when diagnosing cellular or positioning issues.
- Before investigating software settings further, perform the basic hardware checks in SmartSampler2 Diagnostics & Maintenance.
Recommended workflow
- Review the SmartSampler2 installation and confirm that the cellular module and SIM are suitable for the deployment.
- Connect SmartConfig2 to SmartSampler2.
- Allow the device configuration to load automatically, or choose Reload Settings when necessary.
- Open Telemetry > Settings and select the required provider.
- Enter only the connection values supplied for the deployment, then choose Save.
- Open Telemetry > General and choose Check Connection.
- Confirm the Sampler, Network, and Server indicators before relying on remote telemetry.
For an introduction to the application layout, see SmartConfig2 Main Interface. For the configuration-area navigation, see SmartConfig2 Configuration Area. For the verified controller overview and field-use guidance, see SmartSampler2 Overview. Hardware operating limits and safety instructions are provided in the SmartSampler2 Specifications.