
5.1.15 Advanced code view
The Code tab displays the line-based SmartSampler2 program associated with the current visual workflow. Most programs are easiest to create with the visual editor, but advanced users can inspect or edit the generated program directly.
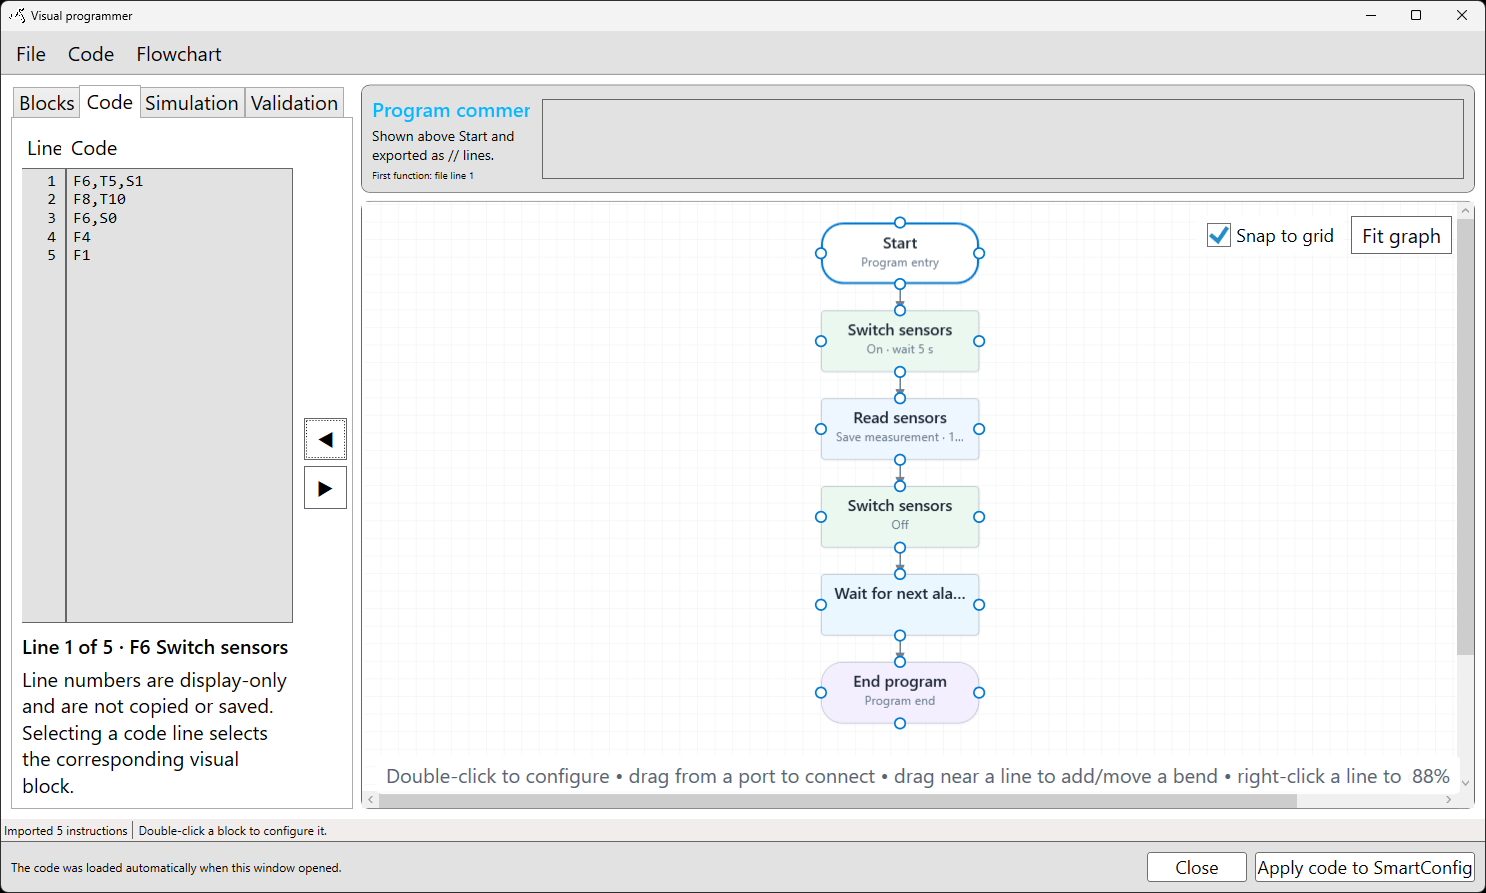
The editor shows program lines beside the visual flowchart. Select a code line to select the corresponding visual block. When the code editor is not being edited, selecting a visual block highlights and scrolls to its associated code line. The displayed line numbers are for reference only; they are not copied or saved as part of the program.
SmartSampler2 user-defined programs are line-based. Each instruction has a function and its supported parameters. The order of the instructions is significant because it determines the physical order in the generated program. Runtime paths such as jumps, returns, comparisons, and subprogram execution are separate from this physical code order.
Changes made in the flowchart and changes made in the Code tab are not synchronised automatically. Use the Code menu when you intentionally want to convert in either direction.
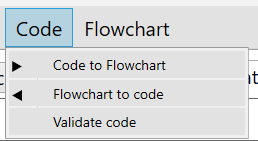
- Code to Flowchart: Imports the current program into the visual editor. This replaces the current flowchart and creates a new automatic layout.
- Flowchart to code: Generates program text from the current visual workflow. Manual edits made in the Code tab can be replaced.
- Validate code: Checks the current program and reports configuration problems that must be corrected before it is applied.
Importing code preserves supported instruction order and runtime relationships, but it does not preserve the original block positions, connection routing, or bend points. If the current visual arrangement may be needed again, save the project before importing code.
Recommended workflow
- Save the current visual project if you may need to restore its layout.
- Edit or paste the program in the Code tab.
- Select Code → Code to Flowchart.
- Review the generated blocks, program sections, jump targets, and connections.
- Open the Simulation tab and use Reset, Step, Run, or Pause to test the workflow without operating SmartSampler2.
- Review simulated input data, user-defined parameters, formula results, temporary values, pulse counters, the active program section, and execution messages where applicable.
- Select Code → Flowchart to code after reviewing the flowchart.
- Select Code → Validate code and correct any reported errors.
- Select Apply code to SmartConfig2 when the program is ready. SmartConfig2 can then apply it to the connected SmartSampler2.
Comments and program sections
Program-level comments placed before the first instruction can be imported, edited, saved, and exported. Keep comments before the first instruction so the program structure remains clear.
Actions can belong to the main program or to supported numbered subprogram sections. Subprogram activation, return, continuation, and jump behavior are represented in the visual workflow, while the generated code retains the physical instruction order.
Validation and troubleshooting
Validate the program before applying it. Validation can identify malformed instructions, missing or unsupported parameters, invalid targets, and values outside supported ranges. Correct the reported problem in the Code tab or by configuring the corresponding visual block, then validate again.
Direct code editing is intended for advanced users. An incorrect function, parameter, target, or program-section value can change execution or prevent the program from operating as intended. Always simulate changes first and verify hardware actions against the connected equipment and the SmartSampler2 hardware interfaces documentation.
To connect SmartConfig2 to SmartSampler2, use the supported USB connection guidance in the hardware documentation. A remote connection uses the installed LTE telemetry module and the configured wireless connection; it requires the device credentials supplied for that deployment. Do not place credentials, serial numbers, or other device identifiers in shared program comments or screenshots.